Introduction
OSSI's Intelli-Site Global system includes both hardware and software, specifically the MAC-4R Series of panels, the drivers necessary for communicating with the panels, and the Intelli-Site software suite to integrate your physical security equipment. This quick start guide will walk you through:
- Installing and configuring the Intelli-Site Server
- Installing LonWorks Drivers
- Adding a MAC-4R Controller to Intelli-Site
- Quickly getting the first valid card read

Procedure

Installing and configuring the Intelli-Site Server
- Install the Intelli-Site software on the computer that will act as the Intelli-Site Server. Make sure to select the following options:
- For the Setup Type, select ServerStation.
- When asked "Do you want to install any drivers?", click [Yes] then select "MAC-4R Series"
- When asked "Are there any Projects to copy?", select [No].
- Double-click the Intelli-Site icon on the desktop. This icon is the shortcut to the Intelli-Site Loader that will run all of the installed components of the Intelli-Site suite.
- The first time the Loader runs, a configuration window is displayed for you to confirm which modules of the Intelli-Site software suite to run. You must select Server, DriverService and Workstation, all of which are the default settings. Click [Ok].
- The Server Registration window is displayed. All of the default information is correct, so click
[Ok] . - The Server License window is displayed. On it is the Key Number needed to generate a license. To register the software and receive a license, press Alt-PrintScreen and paste the screen capture into MSPaint. Save the image as a .jpg then email that file along with the PO number to licensing@ossi-usa.com. A license is not required until the software is installed permanently on the customer's computer. Without a license, Intelli-Site runs in what we call Demo Mode. The software functions sufficiently for the project to be configured in your office or to demonstrate the software's capabilities. The Intelli-Site Server will shut down after 3 hours. It can be restarted an infinite number of times.
- On the Intelli-Site Workstation Registration window, click
[Ok] , accepting all of the default settings. The Logon screen is displayed. Use the user name "master" and the password "m". You are now ready to program your system.
Before you can actually turn on your driver communications you need to have some control panels in your Project.
Installing LonWorks Drivers:
If the install requires the use of an Echelon USB adapter (LT-USB) or an iLon adapter (LT-EA-600 or LT-EA-1000), hardware drivers must be installed before attempting to install the OSSI MAC-4R driver. These two adapters require the proper OpenLDV hardware drivers before the hardware is connected. The following sections walk you through installing the OpenLDV drivers and configuring the LonWorks adapter if necessary.
Installing the driver for the Echelon LT-USB Adapter
- Insert the CD that came with your USB adapter leaving the USB adapter unplugged. This will install the hardware files required to support the USB adapter.
- Upgrade to OpenLDV version 4.0. Go to the Intelli-Site CD and open the OpenLDV subdirectory. Execute the OpenLDV400.exe file and follow the prompts to install OpenLDV.
- Plug the LT-USB adapter into an open USB port. If this is the first USB adapter this computer has loaded, it will be assigned to port "LON1". The PC now has all the information to properly load the new OSSI drivers. If there are any problems with this go to "Start Menu -> Control Panel -> LonWorks Interfaces". Under the USB tab, you should have a network port called LON1.
You are now ready to add the MAC-4R to the Intelli-Site Project.
Installing the driver for an iLon Adapter
- Insert the CD that came with the iLon adapter. Execute the setup.exe file. Follow the prompts and the hardware drivers required to support the devices will be installed.
- Upgrade to OpenLDV version 4.0. Go to the Intelli-Site CD and open the OpenLDV subdirectory. Execute the OpenLDV400.exe file and follow the prompts to install OpenLDV.
At this point, the OpenLDV driver is installed and can now communicate with and configure the iLon adapter. Plug the iLon adapter into an open port on your network. Its default IP address is 192.168.1.222. It will need an address in your network. Please contact your IT department to acquire the address to assign to the iLon adapter. Once you have that address, you may continue.
- Plug the iLon adapter into a network port.
- To configure the iLon adapter, the PC must have an IP address in the same IP network. Set the PC address to 102.168.1.xxx (subnet mask: 255.255.255.0) where xxx is NOT 222. This is only temporary.
- Plug the iLon adapter into a network port.
- On your PC, open an internet browser such as Internet Explorer. If there is any firewall software running on your PC, you may need to allow connections to the iLon.
a. Enter the URL "http://192.168.1.222/config".
b. Logon to the iLon adapter with the user name "ilon" and the password "ilon".
c. Change the IP address and mask to the one provided by IT. Then click "Submit" at the bottom of the page. You may need to scroll down to find it. - Now would be a good time to set the PC's IP address back to the original one. It may require a reboot.
- Add the iLon device to the "LonWorks Interfaces" control.
a. Go to "LonWorks Interfaces" in the Windows "Control Panel". On the Remote Network Interface (RNI) tab, add the iLon device. This is where the driver will find the IP address of the network interface.
b.Highlight "Default" on the base tree. Click the [Add]button.
c. Specify a name for the device that makes sense at a glance. Consider using the last number of the IP address, or the building, or the specific entity that will be controlled by the MAC-4R. A prefix will be automatically added that you will not be able to change. For example, if you name it WHSE13, then its name will be "X.Default.WHSE13".
d. For "Network Manager" select "Other".
e. Enter the IP address of the iLon."
f. Click [Finish].
Configuration is complete. It is advisable to test it. Highlight the name and click "Test" Function. Click [Start]
Adding a MAC-4R Controller to Intelli-Site
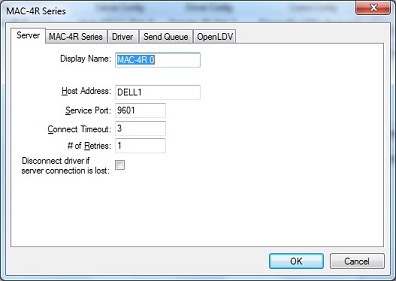
Once Intelli-Site is installed and OpenLDV is installed and configured, you are ready to add a MAC-4R device to the Intelli-Site Project. There are two parts of the Intelli-Site suite that are involved in adding and configuring a device in Intelli-Site. One is the DriverService which provides the conduit for communication between the Server and the MAC-4R. The other is the Workstation which is the user interface to the Intelli-Site system. It doesn't matter which one you do first as long as both are done and the data is the same in both places. After bringing the MAC-4R driver online, set the address of the MAC-4R Controller.
Adding a MAC-4R Driver to the Intelli-Site DriverService
To add a MAC-4R driver to DriverService, right-click on the DriverService icon in the System Tray. You may need to expand the Tray to show hidden icons. Select "Open". The Intelli-Site Driver Configuration Screen will appear. It displays all of the drivers that have been installed and configured. If you just installed Intelli-Site as you follow this quick start guide, the window is most likely empty.
- Click
[Add] . The Choose Driver Type window will appear. - Highlight "MAC-4R Series" and click [Ok]. The Choose Communication Type window displays.
- Select "OpenLDV". The MAC-4R window displays. NOTE: "Rs232" and "TCP/IP" are for legacy systems only.

4. Go to the "OpenLDV" tab. Select the proper OpenLDV port: LON1, LON2, or the name you gave it (e.g., X.Default.WHSE13).
5. Go to the "Driver" tab and provide a unique domain number. The default is 40. It can be any number between 1-255. The domain number must match the Domain field on the MAC-4R RTU in the Project. Make sure the Net field matches the Echelon subnet of the MAC-4R panels. The default values for the rest of the fields are good. Click [Ok].
After the MAC-4R RTU is added to the Project using the Workstation, you may bring the MAC-4R online. Until you bring it online, the icon will be blue. To bring the driver online, right-click on it and select "Online". If it finds the MAC-4R and the Server, the icon will be green/green. If it cannot connect to the MAC-4R, the bottom box will be red. If it cannot connect to the Server, the top box will be red.
Adding a MAC-4R RTU to Intelli-Site
The Intelli-Site Server must be running to add to or modify the Project. In the System Tray, you should see the Server icon 
- In Design Mode, expand System Layout -> Corporate Headquarters -> Area. Right-click on Area and select "Add Node..." Select the correct MAC-4R device in the list under OSSI. Click [Add Node]
. - Right-click on the node just added and select "Properties...". Change the name of the controller. We suggest using the building name with the Net and Node numbers. (WHSE13 1-1) Make sure the Domain and Net match the Domain and Net specified in the DriverService.
- Click
[Ok] .
The driver is now fully configured and ready to be brought online. The panel will show up in the Alarm Queue as off-line because the Server is now trying to communicate with the controller.
Bring the Driver Online
Once the RTU is configured and the driver added to the DriverService, it can be brought online.
- Open the Driver Configuration Screen of the DriverService by right-clicking on the DriverService icon in the System Tray and selecting "Open".
- Right-click on the driver to bring online and select "Online". The icon should go from blue/blue to green/green. The top box of the icon indicates the state of communication with the Server. Green is good. Yellow means the connection is timing out, which can happen if It found the port but not the Echelon adapter. Red means the system cannot connect to the port at all.
Configure the MAC-4R Controller
Now that the communication to the MAC-4R has been established, it must be configured. The address must be set for the panel and the inputs need to be defined as Normally Opened or Normally Closed depending on their specific wiring.
First, set the address. The default address of any MAC-4R control panel 1.120. It should be the Net/Node address in Intelli-Site which starts at 1.1 and goes up from there. To set the panel's address, Intelli-Site needs the unique neural ID of the panel.
- Open the RTU "Properties..." of the panel.
- On the MAC-4R panel, press the SERVICE pin.
- A window pops up in Intelli-Site saying, "Neural ID received. Set new ID?" Click [Yes].
- Click [
Apply] to save the new Neural ID. - Click [
Load Device Address]. A window will pop up asking, "Set Rtu ID#?". Click [Yes]. - Test the communications by clicking on [Set Time]
. If it works properly, you shouldn't see an Offline alarm in the Alarm Queue. You will only receive feedback if something goes wrong. - Now click [Complete] to do a complete download which will update the settings and download the cards to the control panel.
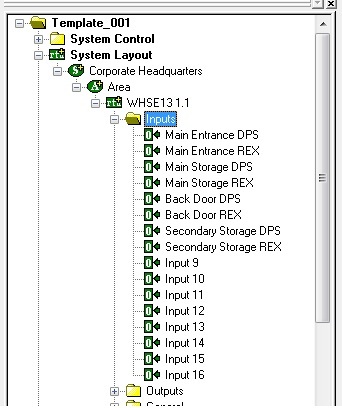
Now that the panel's address is correct, we strongly suggest you name the panel and doors to reflect their purpose and location. The names of the panel and doors are added to the history file, so by including the building name in the name of the panel, you won't need the building name in name for the doors. In our example above, we named our panel "WHSE13 1.1" The doors are "Main Entrance", "Main Storage", "Back Door", and "Secondary Storage".
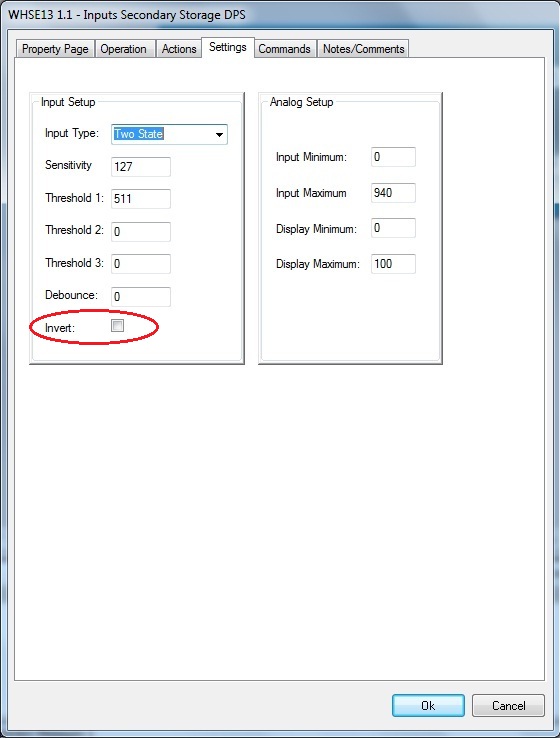
After naming the doors, we need to configure the Inputs to reflect the Normal state for each door. If the Input is "Normally Closed" the "Invert" check box on the Settings tab must be checked. If the Input is "Normally Open", the check box must be clear. "Normally Open" is the default for an Input in Intelli-Site. For each Input that is "Normally Closed", do the following:
- In the Project tree, expand the panel node to see the Inputs node. Expand the Inputs node. All of the Inputs for the panel will appear.

2. Bring up the "Properties..." dialog for an Input that is "Normally Closed". Click on the "Settings" tab. Click the "Invert:" check box.

3. Click
Repeat steps 1-3 for each Input that is inverted. When all of the inverted Inputs are configured, download the settings to the panel by opening the "Properties..." of the RTU and click
Quick Start to a Valid Card Read
Now that the panel is online and configured, there are just a few more steps left before we get a valid card read. At least one Access Group must be added as well as a least one Access Set. At least one card must be added as well. For a full understanding of Access Groups and Sets, please read the manual. Basically, an Access Group is a logical grouping of doors, readers, and other devices that would be accessed by the same people. An Access Set is a logical grouping of Access Groups. Access Sets are assigned to Cardholders.
- In the Project tree, expand Access Control -> MAC-4R
- Right-click on Access Groups and select "Add Node and Edit..."
- Name the Access Group and assign the Readers that fit the Group you are creating. Click [Ok].
- Create as many Access Groups as you need.
- Right-click on Access Sets and select "Add Node and Edit..."
- Name the Access Set.
- Click on the "Access Set / Group Assignment" tab.
- Select the Access Groups that should be part of this Access Set. Click [Ok].
- Create as many Access Sets as you need.
Now switch to Card Management Mode and add a card.
- Click
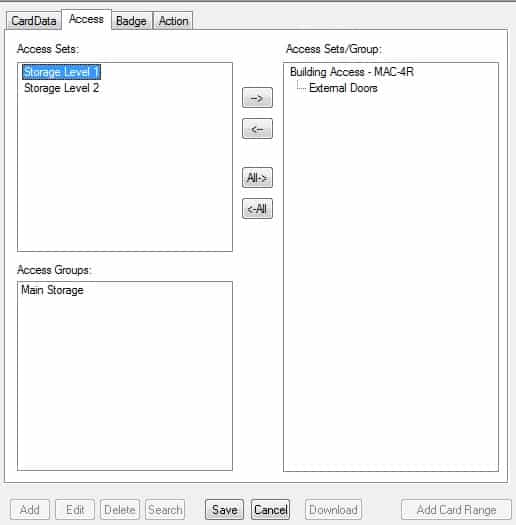
[Add] . Fill in the Card Number, First Name, and Last Name. These are the required fields. - Click the "Access" tab. On the Access tab, you will see all of the Access Sets you defined. If you highlight one of the Access Sets, the Access Groups assigned to that set appear in the "Access Groups" box.

3. Grant Access Sets to this cardholder. Click [Save]
4. Swipe a card at the panel and if you put in the correct data, you will get a valid read. If you didn't, the Alarm Queue will display an alarm for an Invalid Read.
