Introduction
For many installations, it is necessary to access the Intelli-Site Server from a remote computer.
Procedure
The user account on Windows that will run the Intelli-Site Workstation must have Admin Rights to the local computer. Also, the Windows user account on the Server computer must have full database rights or the Project must be using Database Authentication.
Before a remote Workstation can connect to the Server whether in Intelli-Site CS, ES, or GS, the Server must be installed and configured to accept remote connections. The Server will limit those connections to specific computers and will limit the number of concurrent connections based on the license.
Configuring CS is different from configuring ES or GS. To see the steps to configure CS, click here or scroll down. To see the steps to configure ES or GS, click here or scroll down. The configuration for the remote Workstation can be found below or click here.

How to configure the ES or GS Server to accept remote Workstation connections
- On the Server computer, share the Intelli-Site program directory and give Read/Write access rights to authorized users and groups. In some systems, Read/Write access is called "Full Control". This is necessary because the Workstation will need to be able to modify files in the share.
- Run the Intelli-Site Workstation on the Server computer
- In Design Mode, expand the "Computers" node and right-click on the Server node, and select "Properties..." Click on the < Browse > button and find the network share you just created. Click < Ok >
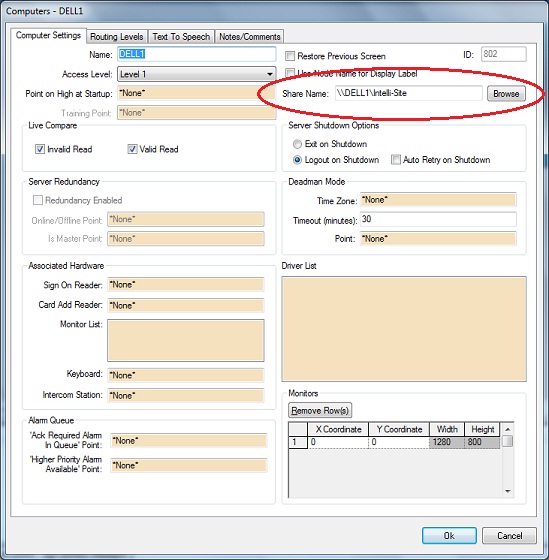
-
- Right click on the "Computers" node, select "Add Node and Edit..." Type in the name for the computer that will run the Workstation remotely. Click < Ok >
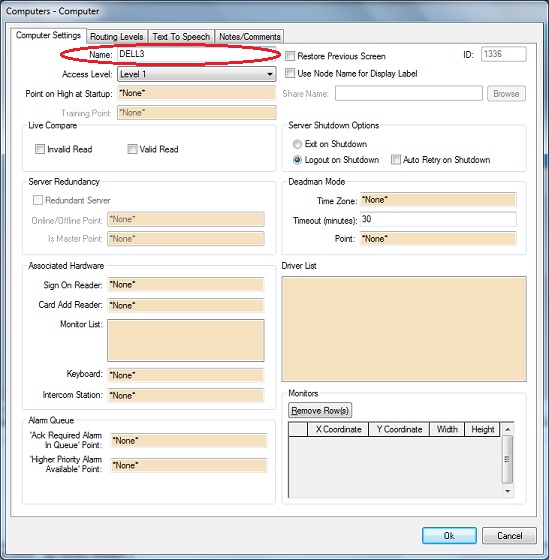
Repeat this step for every computer that will need to connect to the Server.
The Server is now ready to accept remote connections from the specified computers. How to configure the remote Workstation.

How to configure CS to accept remote Workstation connections
On the Server computer, share the Intelli-Site program directory and give Read/Write access rights to authorized users and groups. In some systems, Read/Write access is called "Full Control". This is necessary because the Workstation will need to be able to modify files in the share.
- On the Server computer, run the Workstation and logon. Bring up the wizard by clicking on < Menu > and selecting the Wizard Mode icon
 .
. - Go to the "Admin" screen. Press the < Browse >
button on the lower left to select the network share.
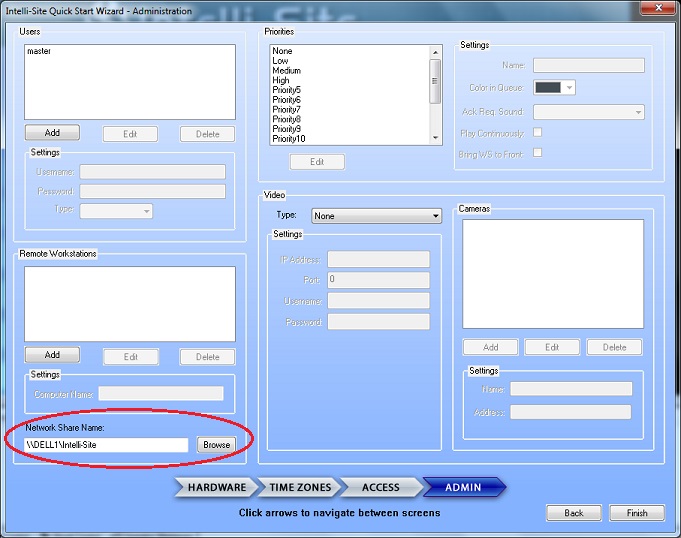
- Click the < Add >
button just above it in the "Remote Workstation" group box. The "Computer Name:" field becomes active. Type in the name of the computer that will serve as the remote Workstation and click < Save >
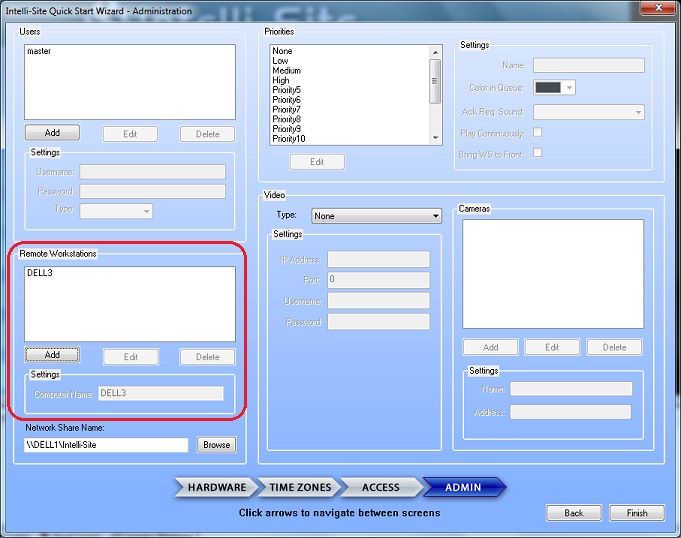

How to configure the remote Workstation to connect to the Server
- Install and run the Workstation on the remote computer. The first time the Workstation runs, the "Workstation Registration" window is displayed. If it doesn't, press the < Cancel > button on the "Logon" screen. Click the < Menu > button and click the "Modify Workstation Registry" icon
 . Type the name of the Server computer in the "Host Name:" field. Then click < Ok >.
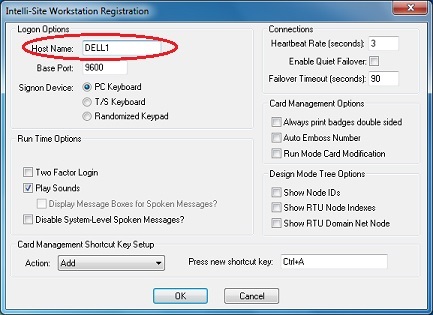
- Click on < Menu > again and select the "Logon" icon
 . Enter the correct user name and password.
Do the above for every computer that will connect remotely to the Server.

Troubleshooting Help
If you have followed all of the steps above and are experiencing difficulty connecting to the Server from the remote Workstation, please see this article to troubleshoot your system. Why can't my Workstation retrieve the project list?
The message "Server share not defined." means there is a problem with the network share, either it doesn't exist or it is improperly defined. Try again.
