Introduction
Intelli-Site has a feature to import cards and cardholder data so you don't have to do it all by hand. This feature allows the user to import cardholder data from any properly-formatted delimited file. It loads card and cardholder data; it does not include Access Sets. Once the cards are imported, you must go into Card Management Mode and assign the Access Sets by hand.
NOTE: Intelli-Site sells an application to import data and Access Sets. Contact your Sales Representative for information on Intelli-Site CONNECT.

This feature is intended to be used once per card
If the Intelli-Site database is in Multi-ID mode and the feature is used more than once per cardholder, there will be duplicate records of the cardholder. The cards cannot be duplicated and will remain associated with the first occurrence of the cardholder information. If you need to perform updates via this sort of method, you must use Intelli-Site CONNECT. Contact your Sales Representative for information on Intelli-Site CONNECT.
Procedure
All of the data to import must be in a properly-formatted delimited file. Excel is a good tool to use to create a delimited file. The following are key requirements for the formatting of the file:
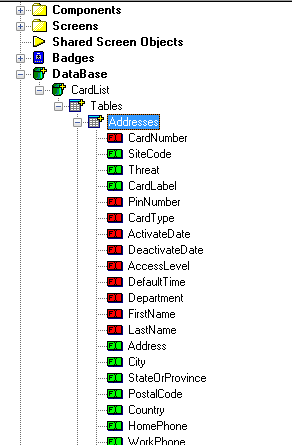
- The first line of the file must contain the headers for the columns of data. These headers are the names of the database fields and must match exactly. The database management software is the definitive way to discover this information, but you may find the field names in Intelli-Site by expanding the DataBase -> CardList -> Tables node.
- If Intelli-Site is in SingleID mode, expand the Addresses node.

If Intelli-Site is in Mult-ID mode, there are two tables that contain the important database fields. They are Dossier and Card. The Dossier table contains the database fields associated with a cardholder such as name, address, rank, etc. Card table contains the database fields specific to cards such as card numbers, formats, and site codes. DO NOT OVERWRITE, MODIFY, TOUCH THE DossierID!! Doing so will corrupt the database beyond repair.

- The data being imported must conform to the database schema. Use the database management software to discover the data types, sizes, and limitations for each field in the database.
- Each row of data must contain the card number.
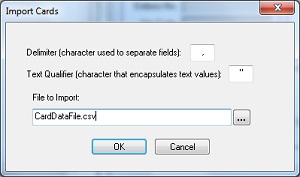
- Text strings must be encapsulated. " is the default. When importing, you will define the character you used.
- If a photo or image is to be imported, the photo must be a .jpg file and must reside in the same folder as the delimited file. It must be named cardnumber.jpg
NOTE: To help make assigning Access Sets easier, we suggest you include a field such as Department. That way you can assign Access Sets to all cardholders in a department.

Steps to Import Card:
Once the delimited file has been created, you may begin the import process. Run the Workstation and logon.
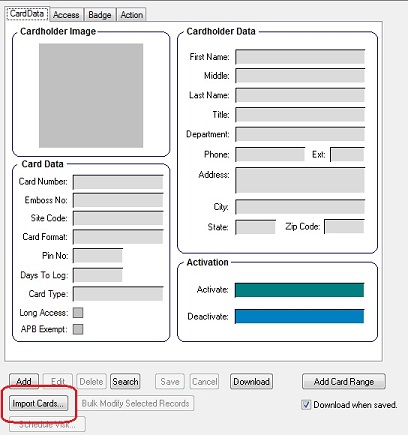
1. Click on the < MENU > button and select "Card Management Mode", . The Card Management screen is displayed. On the right is the CardData screen.

2. Click on < Import Cards... >

Fill in the delimiter, text qualifier, and name of the delimited file. Click < OK >.
The import of the cardholder data will begin immediately.
Once the import is done, you may assign Access Sets. To assign Access Sets to a group of cardholders, please see How to add Access Sets to multiple cardholders.
