Introduction
Intelli-Site Servers can be configured to operate redundantly; that is, to have a “Master” Server online with a “Slave” Server standing by. In the event of a Master Server Failure, the Slave Server will go online as the new Master. As everything done on the Master Server is saved to the Slave Server, you gain fault tolerance with this optional module.
Redundancy is a licensed option. To purchase Redundancy, please contact your Sales Representative.
Procedure
When an Intelli-Site Server with a redundancy-enabled Project is first started, it will attempt to connect to its sister Server. The two Servers maintain an active TCP connection which allows them to quickly detect when the other goes offline. If the other Server doesn't respond within the Keep Alive Timeout (as configured in Server Registration; default 90 seconds), the Server will assume the role of Master Server. If the sister Server responds within the Keep Alive Timeout, they will negotiate who the Master Server is.
Terminology
Terminology with Server Redundancy can be a bit confusing, given that the context of its usage is significant. For example, the meaning of Master Server varies in the context of operations versus configuration. As such, let's quickly define their meanings within the appropriate context.
Operations
Master Server is the current Intelli-Site Server managing the Project. All Workstations and Drivers are connected to this Server.
Slave Server is not currently serving the Project but is online in standby mode so that in the event of a Master Server failure, it will take over and become the Master Server.
Configuration
Master Server is the first computer listed within the Project Node Tree under the "Computers" node. This Server takes precedence over all other redundant Servers should a conflict arise. All production configuration should be completed on this Master Server with the Slave Server offline. Once the Master Server is completely configured, the Slave Server is brought online.
Slave Server must be offline during the preproduction configuration process. Only as a final step will it be brought online.
Server Redundancy
The general idea in configuring redundant Servers is to first completely configure the Master Server. Once the Project configuration is completed and Server Redundancy is enabled, you must manually copy the Project directory to the Slave Server. If you have configured your project including defining network shares for the Master and the Slave, then you may jump to Enabling Server Redundancy.

Before starting Intelli-Site
- Both computers must have the same version of Intelli-Site installed.
- Both computers must have static IP addresses.
- Both computers must be in the same Workgroup or Domain.
- Each computer should have the IP address and hostname of the other computer specified in the lmhosts file. See the article What is the lmhosts file and why do I need it?
- Redundancy is a licensed option. Both the Master and the Slave Servers need their own license key that includes the Redundancy option. To obtain a license, see this article How do I obtain an Intelli-Site license?
There are two critical steps to complete prior to starting Intelli-Site:
- Step 1 - Rename the Project
The Project on the Master Server cannot be named Template_001. That project name is reserved for a special function within Server Redundancy. To rename the Project, open Windows Explorer and locate the folder Template_001 in the "Program FilesIntelli-Site, IncIntelli-SiteSites" folder. Rename the folder keeping the "_001". Consider using "Project_001" or "companyname_001".

Warning
Ensure that the SQL Server is stopped before you rename or copy a project file.
- Step 2 - Create Windows Network Share
A Windows network share of the Intelli-Site directory where the Server.exe resides is required on both Servers. Grant Read/Write privileges.
At this point, we recommend you fully configure the project on the Master Server before bringing the Slave Server online. This saves time and prevents loss of configuration should a fail-over occur mid-configuration. We also recommend you define two (2) pairs of Virtual Points, for a total of four (4). The first pair of virtual points are used to determine if the Intelli-Site Server is online or not. the second pair is used to indicate if a given Server is the current Master Server. What you name these virtual points is up to you. We recommend the names be related to the Servers such as "ServerAOnline", "ServerBOnline", and "ServerAMaster", "ServerBMaster".
Enabling Server Redundancy
Once the project is completed on the Master Server, you are ready to enable Server Redundancy.
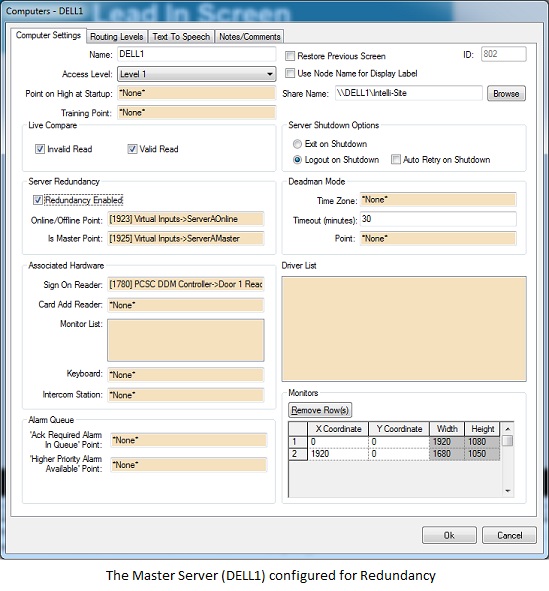
Master Server Properties
The Master Server is the first computer in the list under the "Computers" node in the Project Tree. There are few properties that need to be configured to enable redundancy.
- Expand the "Computers" node in the Project Tree then right-click on the Master Server which is the first computer listed. Select "Properties..."
- Click the button in the upper right quadrant. Select the Intelli-Site network share on the Master Server or type the name in the field.
- Check the "Redundancy Enabled" check box. A notice will pop up informing you that the Server will have to be restarted to enable/disable redundancy. Click OK.
- Drag and drop the virtual point "ServerAOnline" into the "Online/Offline Point:" field.
- Drag and drop the virtual point "ServerAMaster" into the "Is Master Point:" field.
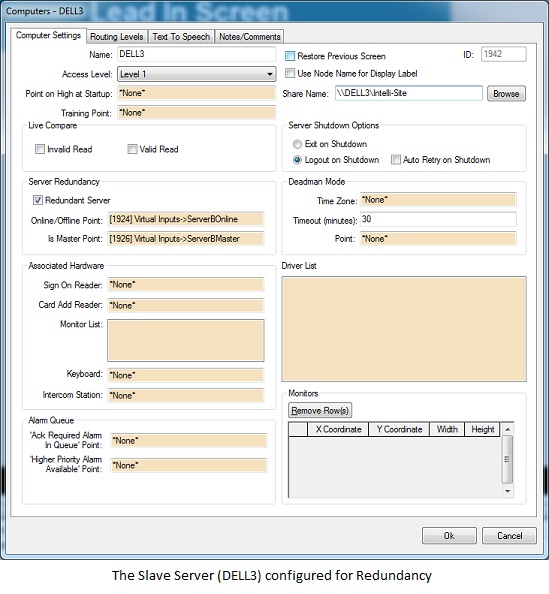
Slave Server Properties
The second node in the list under the "Computers" node is the Slave Server. If it hasn't been added, do so by clicking on the "Computers" node and selecting "Add Node...". If it isn't the second one in the list, drag all of the nodes in front of it except for the Master Server onto the "Computers" node. The dropped node will be moved to the end of the list. Once the correct node is the second one in the list, configure it as follows:
- Right-click on the Slave Server which is the second computer listed. Select "Properties..."
- Check the "Redundancy Enabled" check box. A notice will pop up informing you that the Server will have to be restarted to enable/disable redundancy. Click OK.
- Click the Browse button in the upper right quadrant. Select then Intelli-Site network share on the Slave Server or type the name in the field.
- Drag and drop the virtual point "ServerBOnline" into the "Online/Offline Point:" field.
- Drag and drop the virtual point "ServerBMaster" into the "Is Master Point:" field.
Copy the Project File
- At this point, the Master Server is fully configured and ready to go. We need to copy the Project over to the Slave computer so it will be ready to go as well.
- On the Master Server, Right-click on the Server icon,
 , in the System Tray and select "Immediate Shutdown". If you cannot see the Server icon, please read Why can't I see the Intelli-Site icons in the System Tray?
On the Slave Server, copy the complete Project folder from the Master Server to the Slave Server's Intelli-Site Sites folder.
Start the Servers
You may now start the Intelli-Site Servers beginning with the Master Server. It will take approximately 90 seconds before assuming the Master role. It's 90 seconds because that is the default value for the "Keep Alive Timeout" in the "Server Registration". Once the Master Server is up and running, start the Intelli-Site Server on the Slave computer.
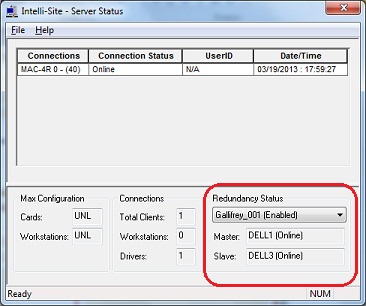
To see the status of the redundant Servers, right-click on the Server icon and select "Open...". The "Intelli-Site Server Status" window appears. In the lower right-hand corner of the window is the "Redundancy Status" group box. The top box in this group is the name of the project, Gallifrey_001, and whether or not redundancy is enabled. Below are the status boxes for the Master and the Slave. The current Master will be listed in the "Master:" field and if it is Online or Offline. The same for the "Slave:" field.
Workstation Registration
Each Workstation must be registered to both Servers. Remember that each computer that will connect to the Server must be defined as a Computer node in the Project.
- Start the Workstation. If the "Logon" screen appears, click Cancel.
- Click Menu and click "Modify Workstation Registry Information" icon,
 .
. - In the "Host Name:" field, type the names of the Servers separated by a comma with no space. The Master Server name is first. The Slave Server name is second.
Driver Registration
There are two parts to Driver registration: the configuration of each Driver as well as the association of a Driver to a computer in the Project.
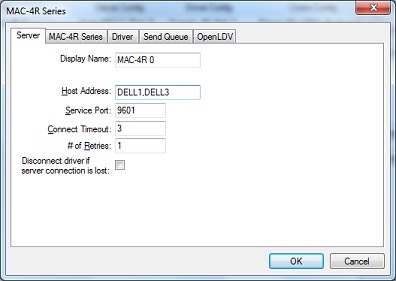
Driver Configuration
Each Driver on every DriverService must be configured. The following steps must be performed for each Driver on every DriverService.
- Right-click on the DriverService icon,
 , in the System Tray and select "Open".
 - Right-click on a Driver and select "Configure". The configuration window will appear.
- In the "Host Name:" field, enter the names of the Servers, Master Server first with a comma and no spaces between them.

It is important to iterate that this must be done for all Drivers on every DriverService.
Project Modifications
In addition, both Servers need to know where all the DriverServices are and which Domains can be controlled by which DriverService. In Redundancy, the DriverService does not bring a Driver online unless the Server tells it to. In fact, when the DriverService detects the Server is missing, it will take all of its Drivers offline until a Server comes online and tells it to bring the Driver online. How redundancy works is a subject for a different article.
For each computer that is running the DriverService, do the following:
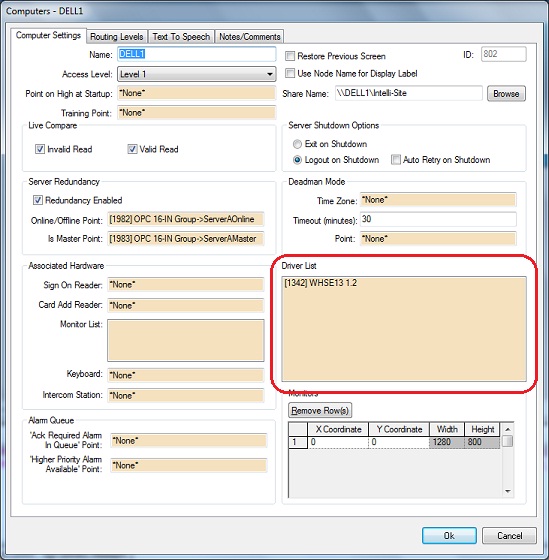
Right-Click on the computer node and select "Properties..."
- For each Domain in the Project, drag and drop one RTU that is in said Domain into the "Driver List".
- For example, Area 51, WHSE13 1.1, and WHSE13 1.2 are all in Domain 40. Only one of these RTUs needs to be dragged into the "Driver List". One Driver connects to the whole Domain.
Congratulations! You have enabled Server Redundancy. If the Master Server fails to transmit a heartbeat for "Keep Alive Time" seconds (default 90 seconds), the Slave will take over and become the Master.
There is one last thing to consider, Driver Redundancy. How does a DriverService handle the change in Master Servers? What happens if the computer running a DriverService goes offline? What about the equipment it was serving?
Driver Redundancy
For the same reasons, Server Redundancy is a good idea, Driver Redundancy is a good idea. If a piece of equipment isn't directly connected to a specific computer, more than one DriverService can be configured to control it but the Driver is only brought online at the command of the Master Server.
Enabling Driver Redundancy
After setting up Server Redundancy, Driver Redundancy is easy. Knowing your system, decide which computers could and should have redundant Drivers. Once these decisions are made, configure it. Each DriverService that should have redundant Drivers need to have a Driver configured for that Domain as above. And the computer node in the Project needs an RTU in that Domain in its "Driver List".
For example, WHSE13 1.1, WHSE13 1.2, and Area 51 are all in Domain 30. The DriverService on DELL1 has been configured with a Driver for Domain 30, specifically a Compass Driver. DELL1 is the Master Server. If it goes offline, then the Slave Server will take over. It should probably take over the DriverService operations as well. Therefore, on DELL3, the Slave Server, add a Compass Driver to the DriverService. Configure that Driver with the correct Host Names and the correct Domain (30). In the Project, drop any one of the three RTUs in the "Driver List" on the DELL3 computer node's "Properties..." page. This is basically the same procedure as the section Driver Registration.